A buyer once sent me two discs with the same P120 marking. One finished furniture panels cleanly; the other loaded fast and left swirl marks. The difference was not the grit number. It was backing, coating, hole pattern, and machine fit.
A custom sanding disc functions as a matched abrasive system defined by grain type, grit size, backing, resin bond, coating structure, diameter, hole pattern, attachment method, and tool compatibility. Each element affects cut rate, heat control, dust extraction, loading resistance, scratch consistency, and disc life. Ceramic grain, for example, may fail early when paired with weak backing or incorrect pad support. Proper specification begins with machine type, substrate, pressure level, finish target, wet or dry condition, and changeover requirements.
Which Sanding Disc Specs Come First?
The first custom sanding disc specifications should define the complete disc system: abrasive grain, grit size, backing material, resin bond, coating structure, disc diameter, hole pattern, attachment method, and tool compatibility. These elements must match the machine, pad, substrate, pressure level, finish target, dust extraction setup, wet or dry condition, and expected changeover frequency.
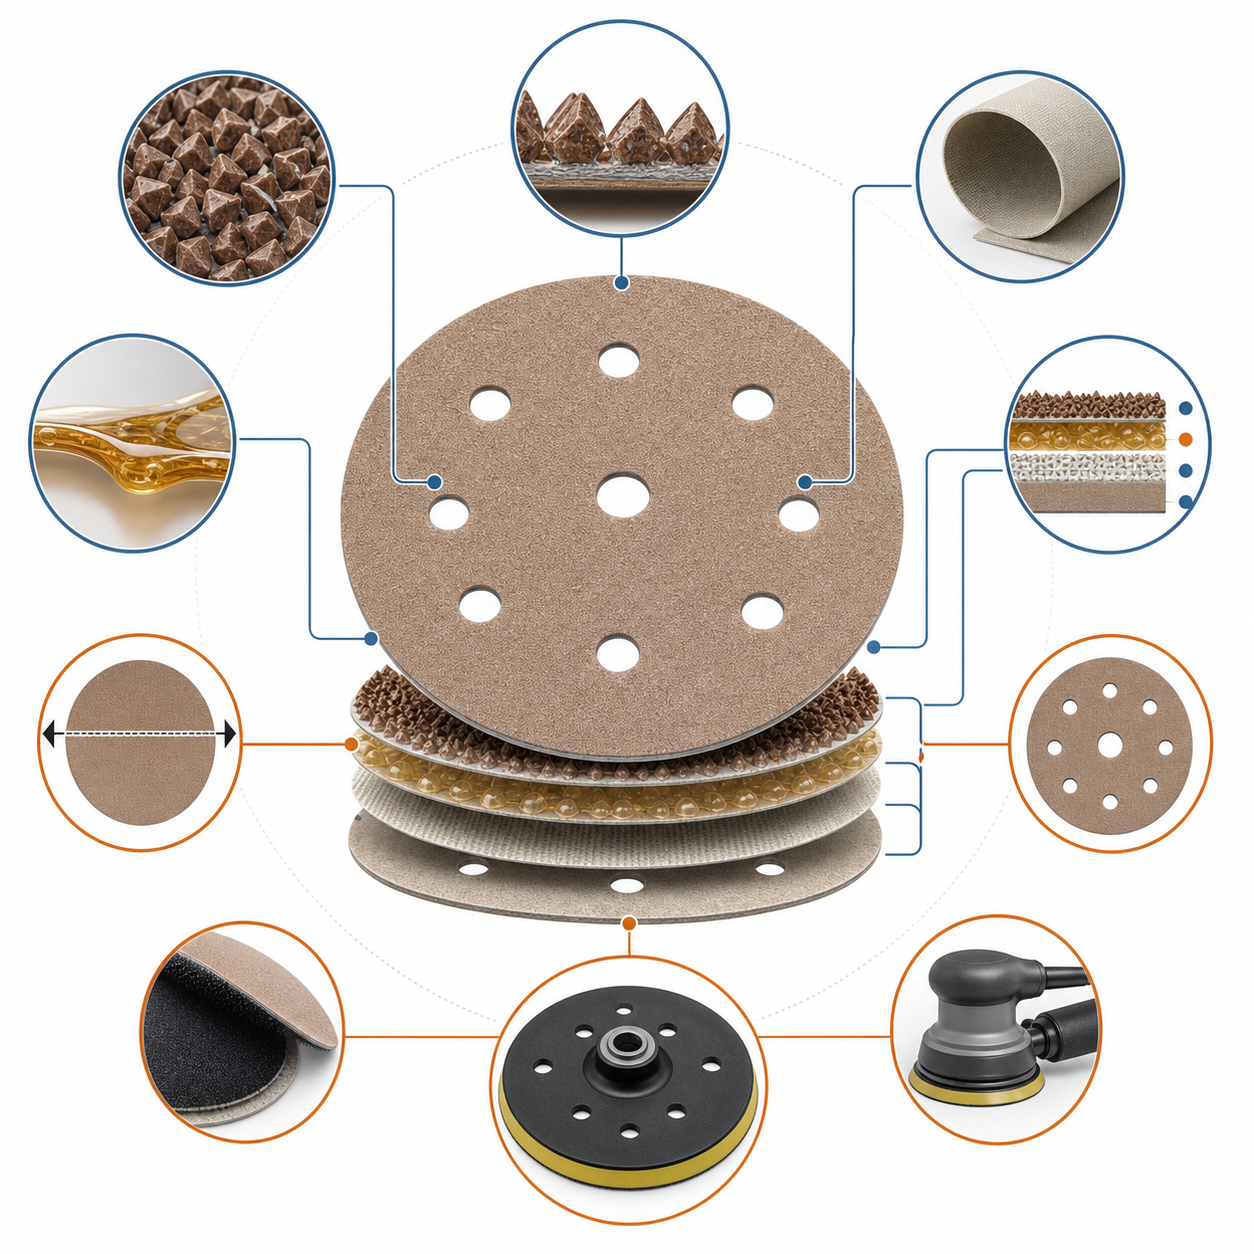
A sanding disc spec should start with the whole working system, not the most expensive grain. One wrong match between disc, pad, and dust holes can turn a P180 finishing step into heat marks and rework.
| Spec Area | Define First | Risk If Mismatched |
|---|---|---|
| Grain and grit | Aluminum oxide, zirconia, ceramic; P40-P2000 | Slow cut, scratches, short life |
| Backing and bond | Paper, film, cloth; resin strength | Tearing, curling, heat failure |
| Coating structure | Open coat1, semi-open, closed coat | Loading, burning, poor finish |
| Size and holes | Diameter and dust pattern | Weak extraction, uneven sanding |
| Attachment | Hook & loop, PSA, quick-change | Disc fly-off, slow changeover |
In a furniture line making lacquered panels, I helped compare 150 mm hook & loop discs on orbital sanders with 15-hole pads. The buyer wanted P180 ceramic on C-weight paper, but the pressure was low and the dust system matched another hole layout. We changed to P180 aluminum oxide, open coat, C/D latex paper, and the correct 15-hole pattern. Disc life improved around 25-30%, and operators used about 20 fewer discs per shift.
That result did not come from grain alone. The resin bond controlled heat resistance, the backing handled edge flex, and the hole pattern kept dust from loading the surface.
A P180 disc can leave P120-like defects if the dust-hole pattern blocks extraction, because loaded sanding swarf rolls under the abrasive and cuts deeper than the nominal gritTrue
Grit size only describes the abrasive particles on the disc. If the disc holes do not align with the pad and extractor, dust cannot escape efficiently; packed debris creates random deep scratches, heat marks, and premature loading even when the selected grit is technically correct.
When specifying a custom sanding disc, choosing the highest-cost ceramic grain first will prevent most pad, backing, and dust-hole compatibility problemsFalse
Ceramic grain improves cut and life only when the whole system supports it. A mismatched pad density, wrong hook-and-loop interface, weak backing, or blocked dust-hole layout can still cause heat buildup, edge tearing, poor finish, and short disc life regardless of grain price.
How Should Grain Match Material and Pressure?
Abrasive grain should match substrate, application severity, heat sensitivity, and operating pressure. Aluminum oxide suits general wood, filler, primer, mild steel, and common sanding. Zirconia alumina2 fits heavier metal removal under higher pressure. Ceramic alumina3 supports demanding metal, robotic, weld, and alloy work when setup justifies cost. Silicon carbide serves coatings, plastics, rubber, glass, stone, ceramics, and solid surfaces well.
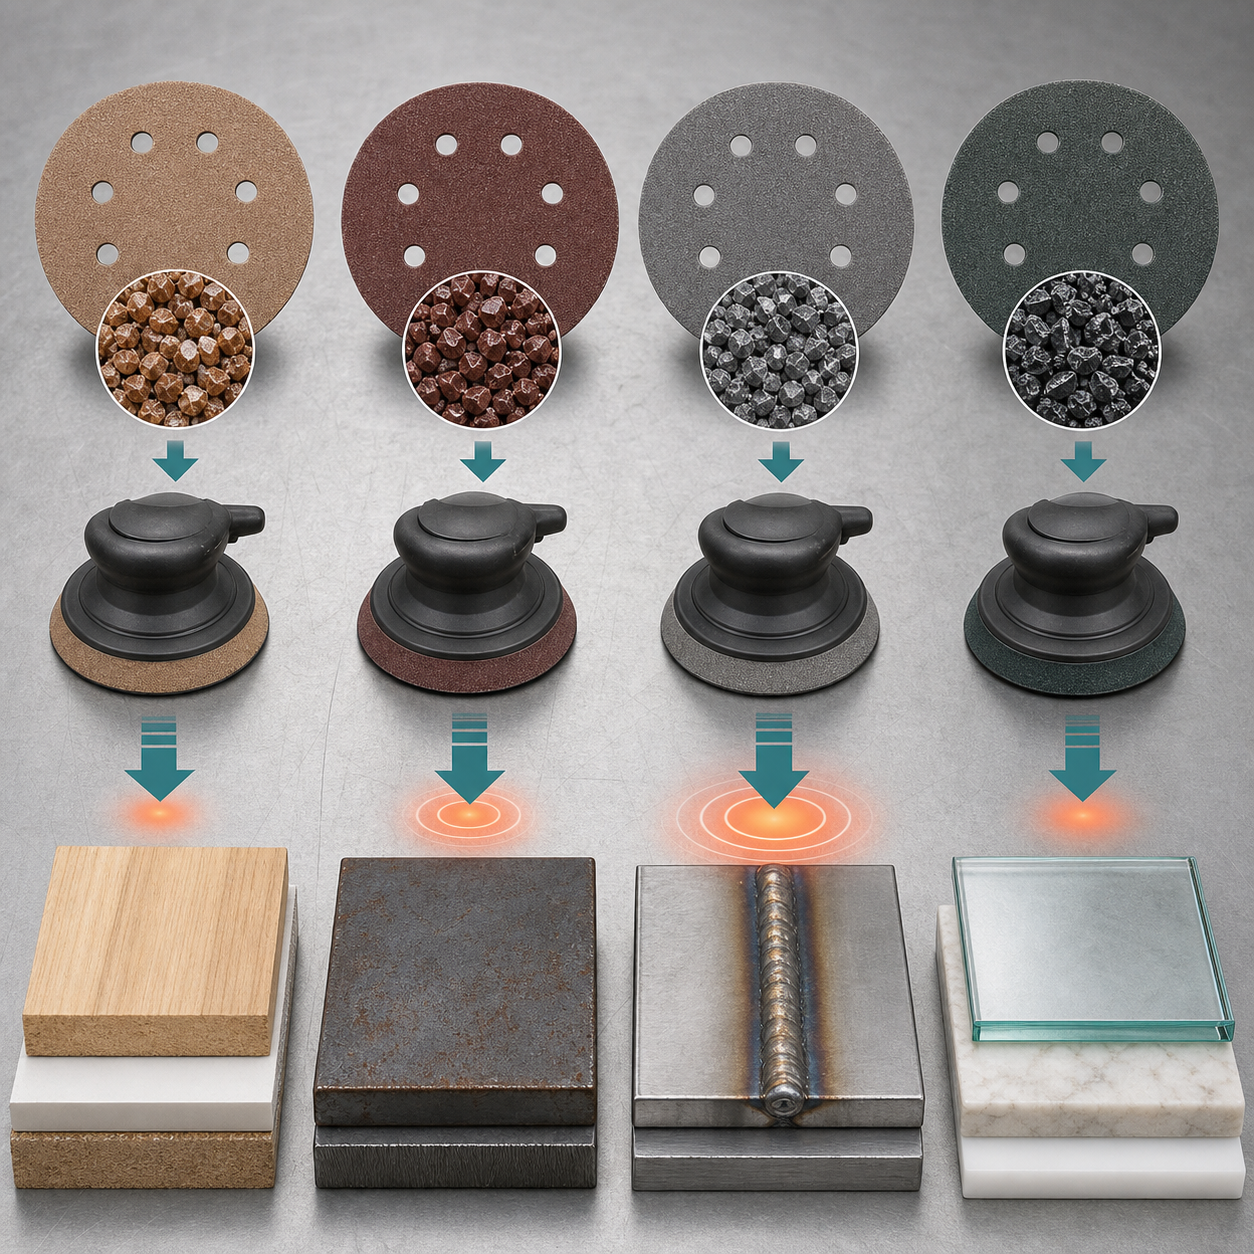
Grain choice changes once pressure changes. A P80 disc that cuts cleanly on primer can glaze fast on stainless welds, even when the grit number looks correct.
| Grain | Best Fit | Pressure Level | Watch Point |
|---|---|---|---|
| Aluminum oxide | Wood, filler, primer, mild steel | Low to medium | Can wear fast in severe metal work |
| Zirconia alumina | Carbon steel, welds, heavy deburring | Medium to high | Needs pressure to self-sharpen |
| Ceramic alumina | Robotic sanding, alloys, weld blending | High and stable | Cost only makes sense with the right setup |
| Silicon carbide | Coatings, plastics, glass, stone, solid surface | Light to medium | Sharp but more friable |
I saw this with a metal fabrication customer in Jiangsu using 125 mm hook & loop discs on carbon steel brackets. Their P60 aluminum oxide discs lasted about 18-22 parts, then heat marks appeared. We tested P60 zirconia on a heavier paper backing with a stronger resin bond system. Lifespan increased to around 35-40 parts, and operators changed discs less often.
For furniture shops, the answer often goes the other way. A P180 ceramic disc on MDF primer may look premium, but pressure is too light to fracture the grain properly. Aluminum oxide or silicon carbide can give a cleaner finish and lower cost per panel.
I suggest matching grain to the real cutting condition, not only the material name. Check pressure, heat sensitivity, machine speed, and finish target before approving a bulk order.
Zirconia alumina discs often underperform at light hand pressure because the grain needs medium to high load to micro-fracture and expose fresh cutting edgesTrue
Zirconia is pressure-dependent: without enough force, the grain can rub and dull instead of self-sharpening. This is why it can feel slower than aluminum oxide on primer or filler, yet outperform it on welds and carbon steel deburring.
A P80 ceramic disc will always cut cooler than a P80 aluminum oxide disc because the grit size is identical and ceramic grain is harderFalse
Heat is controlled by grain fracture behavior, pressure, backing, speed, loading, and work material, not grit size alone. Ceramic can run efficiently under high pressure, but at too little pressure it may rub instead of fracturing, which can increase heat and glazing.
Which Grit Range Fits Finish Targets?
Grit range should match required scratch depth, stock removal rate4, and the next production step. P36-P80 supports aggressive removal, weld blending, shaping, coating stripping, and heavy rust removal; P100-P240 suits surface preparation, filler shaping, primer sanding, blending, and intermediate finishing; P320-P800 refines scratches for paint, wood, and coatings, while P1000+ prepares high-gloss or precision surfaces. A defined grit ladder prevents defects.
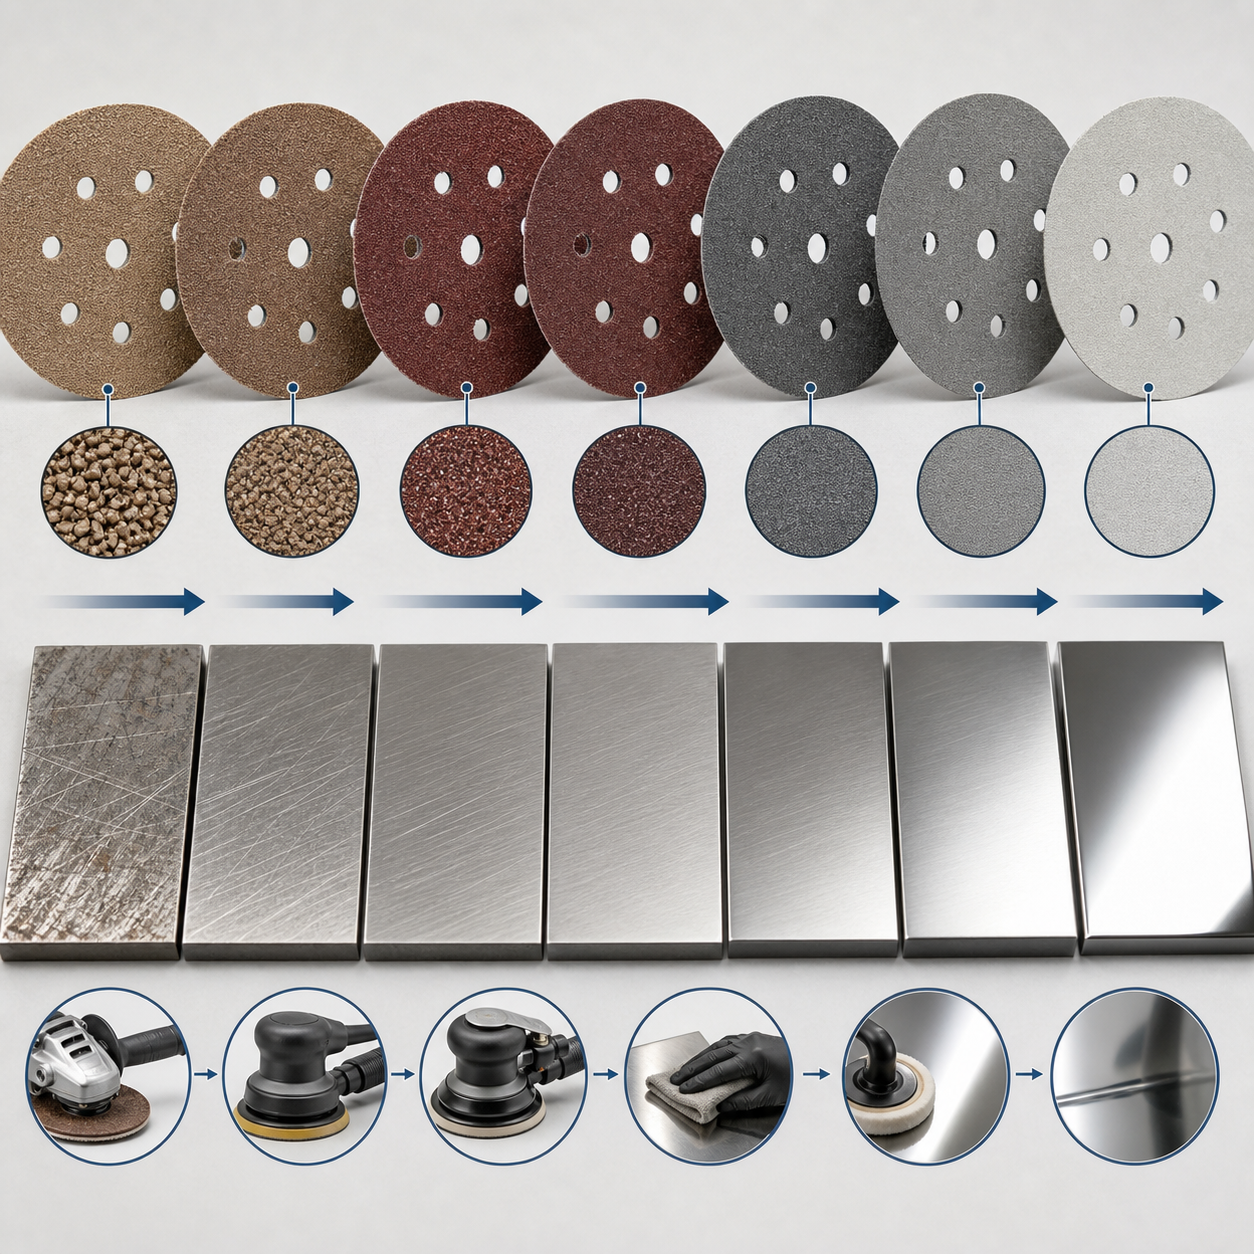
The right grit range is decided by the scratch you can accept after the next step, not by the grit number alone. A P80 scratch that looks clean before coating can reappear after primer shrinkage or polishing.
| Finish Target | Practical Grit Range | Typical Use | Watch Point |
|---|---|---|---|
| Heavy removal | P36-P80 | Weld blending, shaping, coating stripping | Control heat and deep scratches |
| Surface preparation | P100-P240 | Filler shaping, primer sanding, blending | Avoid jumping from P80 to P240 |
| Fine finishing | P320-P800 | Paint prep, wood sealer sanding, coating prep | Manage loading and dust extraction |
| High-gloss prep | P1000+ | Clear coat defect removal, polishing prep | Use film or waterproof backing when needed |
In an automotive refinishing line I supported, operators moved from P120 straight to P400 on 150 mm hook & loop discs. The primer still showed coarse marks after baking. We changed the ladder to P120, P180, P240, then P400, using aluminum oxide on C-weight paper for dry sanding. Rework dropped by around 20-25% over the next few weeks.
For metal fabrication, the logic changes. P36 or P60 zirconia cloth discs can remove weld scale fast, but they leave a deep scratch pattern. If the part needs powder coating, I usually suggest stepping through P80 and P120 before cleaning. That small extra step often costs less than rejected coating work.
Keep the grading system consistent, such as FEPA P-grade, when comparing suppliers. I also recommend testing the full grit ladder on real parts, because one isolated sample disc cannot show the final surface result.
When specifying a custom sanding disc sequence, the safe grit range is governed by the maximum scratch depth the next coating or polishing step can remove, so a P80 scratch can still print through after primer shrinkage even if it looks hidden immediately after primingTrue
Primer and filler can temporarily mask deeper abrasive scratches, but solvent loss and film shrinkage can reveal them later. This is why finish planning should control scratch depth with smaller grit steps, not simply stop when the surface looks visually uniform.
For finish preparation, jumping directly from P80 to P320 is usually safe because the finer P320 disc will erase the P80 scratch pattern faster than intermediate gritsFalse
A large grit jump often leaves the deeper P80 scratches beneath a finer surface haze. Intermediate steps such as P120-P180-P240 reduce scratch depth progressively, making it easier for primer, sealer, or polishing stages to produce a stable finish.
How Does Backing Control Strength and Flexibility?
Backing material controls how a sanding disc resists pressure, flexes around contours, and maintains scratch consistency. Paper backing suits wood, fillers, primer, and lighter dry sanding, with lighter papers adding flexibility and heavier papers adding stability. Cloth improves tear resistance for metalworking and aggressive sanding, film supports flat high-grit finishing, and vulcanized fiber5 handles heavy resin fiber disc work with backing pads.
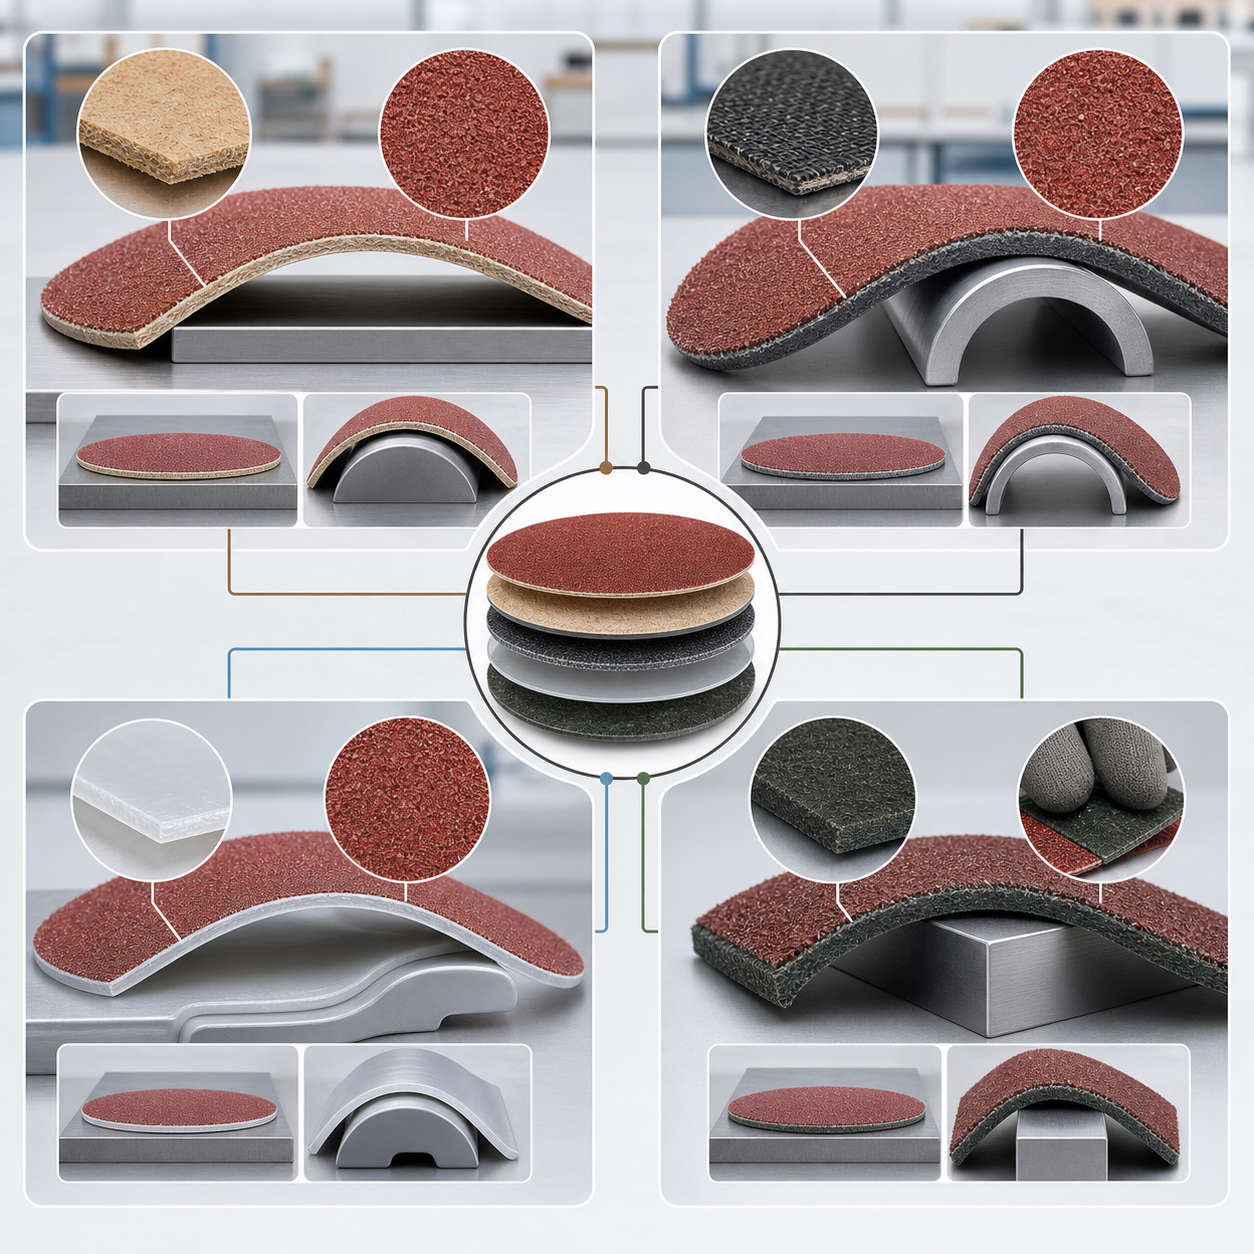
Backing decides whether pressure becomes controlled cutting or ugly edge marks. A P180 disc on soft A-weight paper can follow cabinet door profiles, while C- or D-weight paper keeps flatter contact on wide panels.
Last year, I helped a Dongguan furniture factory compare 150 mm hook & loop discs on primer sanding before topcoat. Their old P240 paper disc lasted about 35 doors before the edge curled and the scratch pattern became uneven. We moved the same grit to heavier latex paper with a stearated bond system, and lifespan improved around 20-25% in dry sanding. The finish stayed more stable, but it felt less forgiving on rounded moulding. That is the trade-off.
Cloth backing changes the behavior under force. On metal deburring, a P60 aluminum oxide or ceramic grain disc needs backing that resists tearing at edges and weld spots. Paper often fails early there. Film backing works differently; it gives a very flat base, so high-grit scratches stay more uniform on clearcoat, plastics, and coatings. For resin fiber discs, vulcanized fiber needs the correct backing pad, because the pad supports pressure and keeps the disc from cracking.
I usually ask four questions before choosing backing: machine pressure, part shape, wet or dry sanding, and finish target. Too weak, and the disc tears. Too stiff, and it skips over contours or cuts sharp edge scratches. For automated sanding lines, thickness tolerance and batch stability matter as much as the backing name. I suggest testing one small production batch on real parts before changing the full order.
On 150 mm hook-and-loop primer sanding discs, moving the same P240 grain from light A-weight paper to heavier latex C- or D-weight paper can improve scratch uniformity on flat doors by resisting edge curl and backing collapseTrue
The abrasive grain size has not changed, but the backing changes how pressure is delivered. Heavier latex paper holds the disc flatter under heat, humidity, and repeated edge loading, so the same grit can leave a more even scratch pattern on wide panels.
A heavier D-weight paper backing always makes a sanding disc more flexible because the extra paper fibers bend and absorb pressure better than A-weight paperFalse
D-weight paper is stronger and more dimensionally stable, but it is less conformable than A-weight paper. That stiffness helps flat sanding, yet it can bridge profiles or cabinet-door contours instead of following them closely.
How Do Disc Bonds And Coatings Control Heat?
Disc bonds and coatings control heat by holding abrasive grains securely while managing chip flow, swarf release, and dust evacuation. Make coat, grain layer, size coat, and optional supersize or top coat determine cutting behavior. Closed coats cut aggressively but load faster on soft materials, while open coats, stearates, and grinding aids reduce clogging, heat buildup, burn marks, and rework.
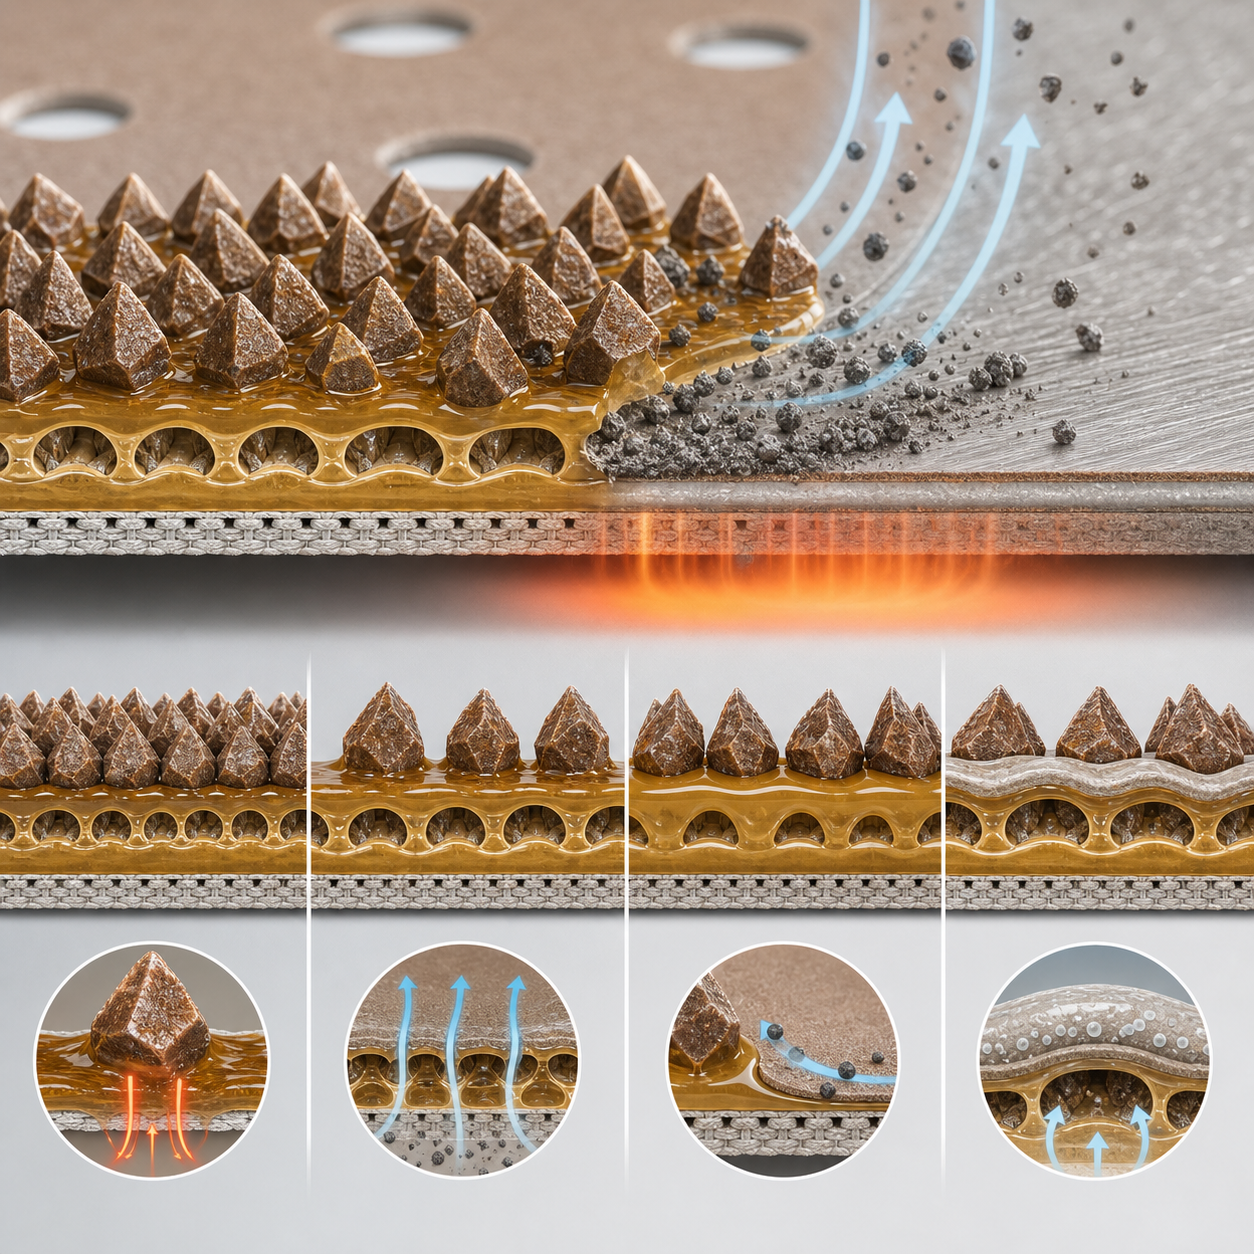
Heat control starts where the grain meets the workpiece, not after burn marks appear. The make coat anchors each abrasive grain, the size coat locks it, and a supersize top coat can change how chips release during cutting.
In my experience, buyers often compare grit only, then miss the coating structure completely. A closed-coat6 P80 aluminum oxide disc on C-weight paper may remove weld discoloration or hardwood quickly because more grains contact the surface. The trade-off is loading. On pine furniture panels, I have seen closed-coat discs lose useful cut after around 20-30 doors, while an open-coat version reached roughly 35-45 doors before operators changed discs. More open space between grains lets resin dust escape instead of glazing the disc face.
Paint, primer, and body filler behave differently from steel or oak. For automotive refinishing lines, a P180-P320 stearated hook-and-loop disc7 usually runs cooler because the anti-loading layer reduces packed dust. That helps protect the scratch pattern and lowers rework on primer sanding. For stainless steel, I prefer ceramic grain with a heat-resistant resin bond and grinding aid, especially in P60-P120. The grinding aid breaks down under pressure, reducing heat at the cutting point; it is small chemistry, but it changes disc life.
Here is what matters most: match the coating to the waste material. Soft dust needs escape space or stearate. Hot metal needs bond strength and grinding aid. I suggest testing two coating styles on the same machine speed, pressure, and workpiece count before scaling the order.
A stearated or grinding-aid supersize coat can reduce sanding heat by helping chips release before they pack between grains, especially on resinous wood, paint, or soft metalsTrue
The supersize layer sits above the size coat and does not primarily hold the grain. Its value is tribological: additives such as zinc stearate or grinding aids reduce loading and friction, so the disc cuts longer before heat rises from rubbing instead of cutting.
A heavier size coat always makes a sanding disc run cooler because more resin around each grain improves heat insulationFalse
The size coat locks abrasive grains in place, but excessive resin can bury grain tips, reduce chip clearance, and make the disc rub more than cut. That added friction often raises heat, even though grain retention may improve.
Which Disc Geometry Ensures Machine Compatibility?
Machine-compatible sanding disc geometry depends on matching disc diameter, center hole, thickness, outer edge quality, special shape, and dust-extraction hole layout8 to the pad system. Random-orbital discs often use 125 mm or 150 mm diameters, but 5-hole, 6-hole, 8-hole, 15-hole, multi-hole, mesh, and proprietary patterns must align precisely for dust control, heat reduction, finish consistency, and disc life during repeat sanding.
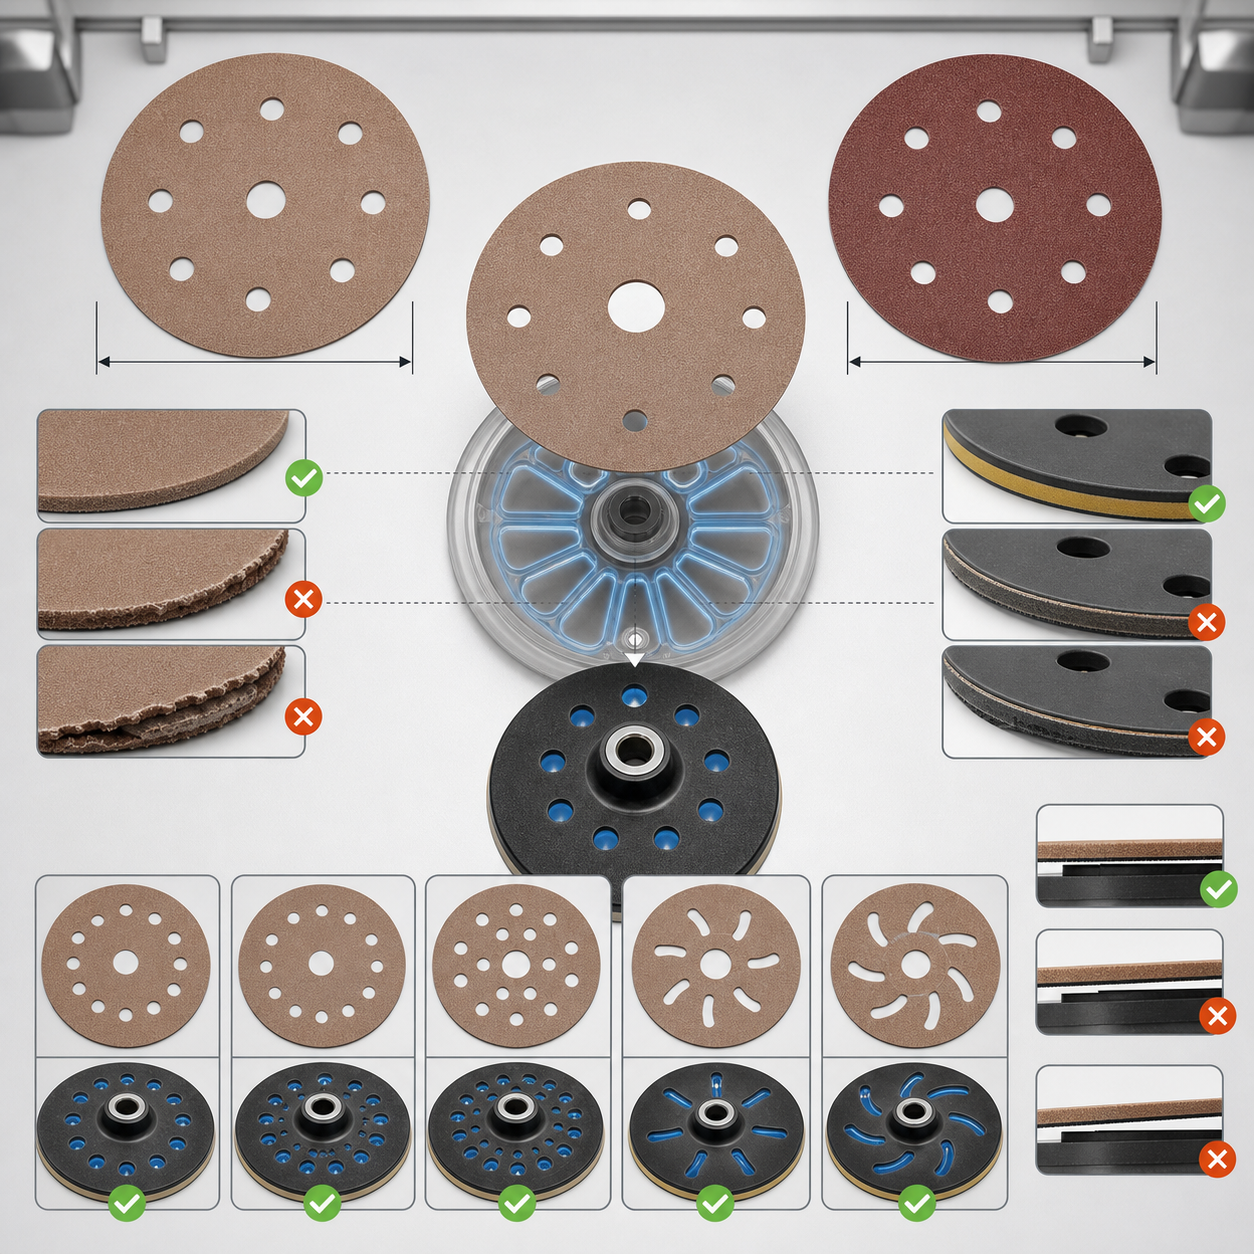
A disc can sit on the pad and still fail the machine. The real compatibility test is whether diameter, holes, center fixing, and edge finish match the sanding path under speed.
| Geometry detail | Compatibility check | Why it matters |
|---|---|---|
| Diameter | 125 mm or 150 mm for most random-orbital pads | Controls pad support and edge stability |
| Dust holes | 5-hole, 6-hole, 8-hole, 15-hole, multi-hole, or mesh | Affects extraction, loading, heat, and finish |
| Center hole | Match arbor or locking screw size | Prevents vibration and unsafe mounting |
| Thickness and backing | Paper, film, fiber, or cloth stiffness | Changes pad contact and cut pressure |
| Edge and shape | Clean die-cut, triangle, contour, or detail profile | Prevents chatter and premature edge wear |
I saw this clearly with a furniture line using 150 mm hook & loop P180 aluminum oxide discs9. Their new 15-hole discs fitted the pad, but four holes missed the vacuum channels by about 3 mm. Dust stayed under the disc, loading increased, and each disc lasted only around 35-40 cabinet doors instead of 50.
Small mismatch. Big cost.
For angle grinders and fiber discs, geometry also becomes a safety issue. Check center hole size, backing stiffness, guard clearance, locking nut contact, and maximum operating speed. A 115 mm semi-flexible disc rated below the grinder speed is not just inefficient; it is risky.
A 150 mm random-orbital disc with the wrong hole pattern can run on a 150 mm pad but lose extraction efficiency because covered vacuum ports trap dust, increase heat, and accelerate loadingTrue
Diameter alone does not prove compatibility. Dust-hole alignment must match the backing pad and machine extraction path, whether 6-hole, 8-hole, 15-hole, multi-hole, or mesh. Blocked ports reduce airflow at speed, which can raise sanding temperature and leave more debris between the abrasive and workpiece.
A 125 mm sanding disc can be safely used on a 150 mm random-orbital pad if the hook-and-loop backing engages firmly, because the smaller disc reduces edge vibrationFalse
Using a disc smaller than the pad leaves unsupported pad edges exposed. At operating speed, those edges can mark the workpiece, destabilize the orbit, damage the pad hooks, and reduce control. Disc diameter should match the pad size, commonly 125 mm to 125 mm or 150 mm to 150 mm.
How Should Sanding Disc Attachment Be Specified?
Sanding disc attachment should be specified by tool model, pad or holder type, maximum speed, interface style, and changeover needs. Hook-and-loop systems require compatible hooks and loop backing; PSA discs10 need tack matched to heat, residue, and removal demands; fiber and quick-change discs require correct holes, hardware, stiffness, holders, and speed ratings for safe, repeatable performance across production batches and operator safety.
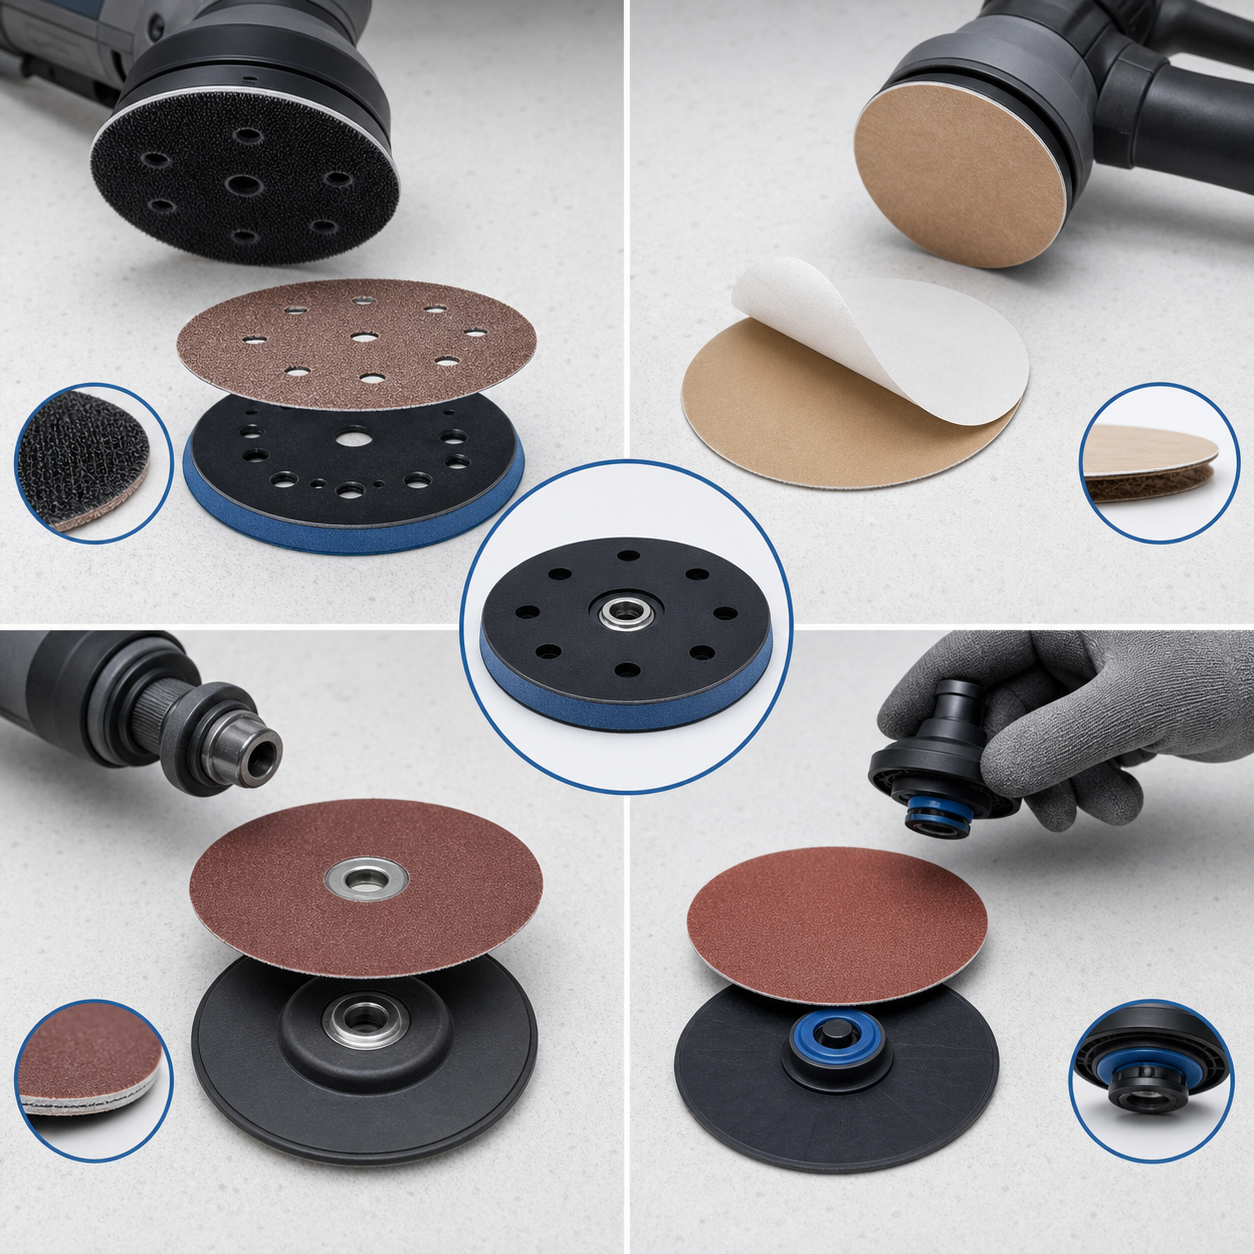
A disc that fits the diameter can still fail if the attachment interface is wrong. I have seen 150 mm hook & loop discs fly off random-orbital tools because the loop fabric looked compatible but did not grip worn hooks at 10,000 OPM.
Before placing a custom order, confirm these details:
- Tool model and pad diameter, including 5-hole, 6-hole, 8-hole, or multi-hole vacuum patterns.
- Pad or holder type, plus whether operators use soft, medium, or hard backup pads.
- Maximum tool speed, especially for fiber discs running on 100-125 mm angle grinders.
- Interface style: hook & loop, PSA, center-hole fiber, roll-on, or quick-change button.
- Changeover target, such as changing grits every 20 panels or every full shift.
In a furniture line, a customer changed from P180 PSA paper discs to P180 C-weight hook & loop discs for faster grit steps. Changeover time dropped from about 35 seconds to under 10 seconds per disc, but finish marks increased because the pad was too soft. We moved them to a medium-density pad and a tighter loop backing. The scratch pattern became steadier.
PSA discs need adhesive tack matched to heat, storage, and removal. Too much tack leaves residue after long sanding cycles; too little tack peels when the pad reaches around 50-60 degrees Celsius. Fiber discs need the correct center hole, locking nut, backing stiffness, and speed rating. Quick-change discs are even less forgiving.
I suggest sending used pads or holders with the drawing. It prevents the spec sheet gap and keeps production batches safe, repeatable, and easier for operators to manage.
A 150 mm sanding disc with the correct diameter can still be unsafe at 10,000 OPM if its hook-and-loop fabric, hole pattern, and backup pad hardness are not matched to the actual tool padTrue
Disc fit is not defined by diameter alone. Vacuum-hole alignment affects dust extraction and balance, while worn hooks or incompatible loop fabric reduce shear grip at high orbital speeds. Pad hardness also changes how evenly the disc loads and stays seated during sanding.
If a sanding disc has the same diameter as the tool pad, any 5-hole, 6-hole, 8-hole, or multi-hole vacuum pattern will perform the same because airflow equalizes under the discFalse
Vacuum holes must align with the tool pad and extraction channels. Misaligned holes restrict airflow, increase heat and dust loading, and can create uneven suction or imbalance, even when the disc diameter is correct.
How Should Sanding Disc Dust Extraction Work?
Sanding disc dust extraction should be engineered through matched hole patterns, open-coat spacing11, anti-loading treatment, and mesh abrasive designs that move dust away from the sanding interface quickly. Effective extraction reduces loading, heat, airborne dust, and scratch defects, but exposure and combustible-dust compliance depend on the full tool, pad, vacuum, filtration, ventilation, housekeeping, PPE, material, and regulatory system in production.
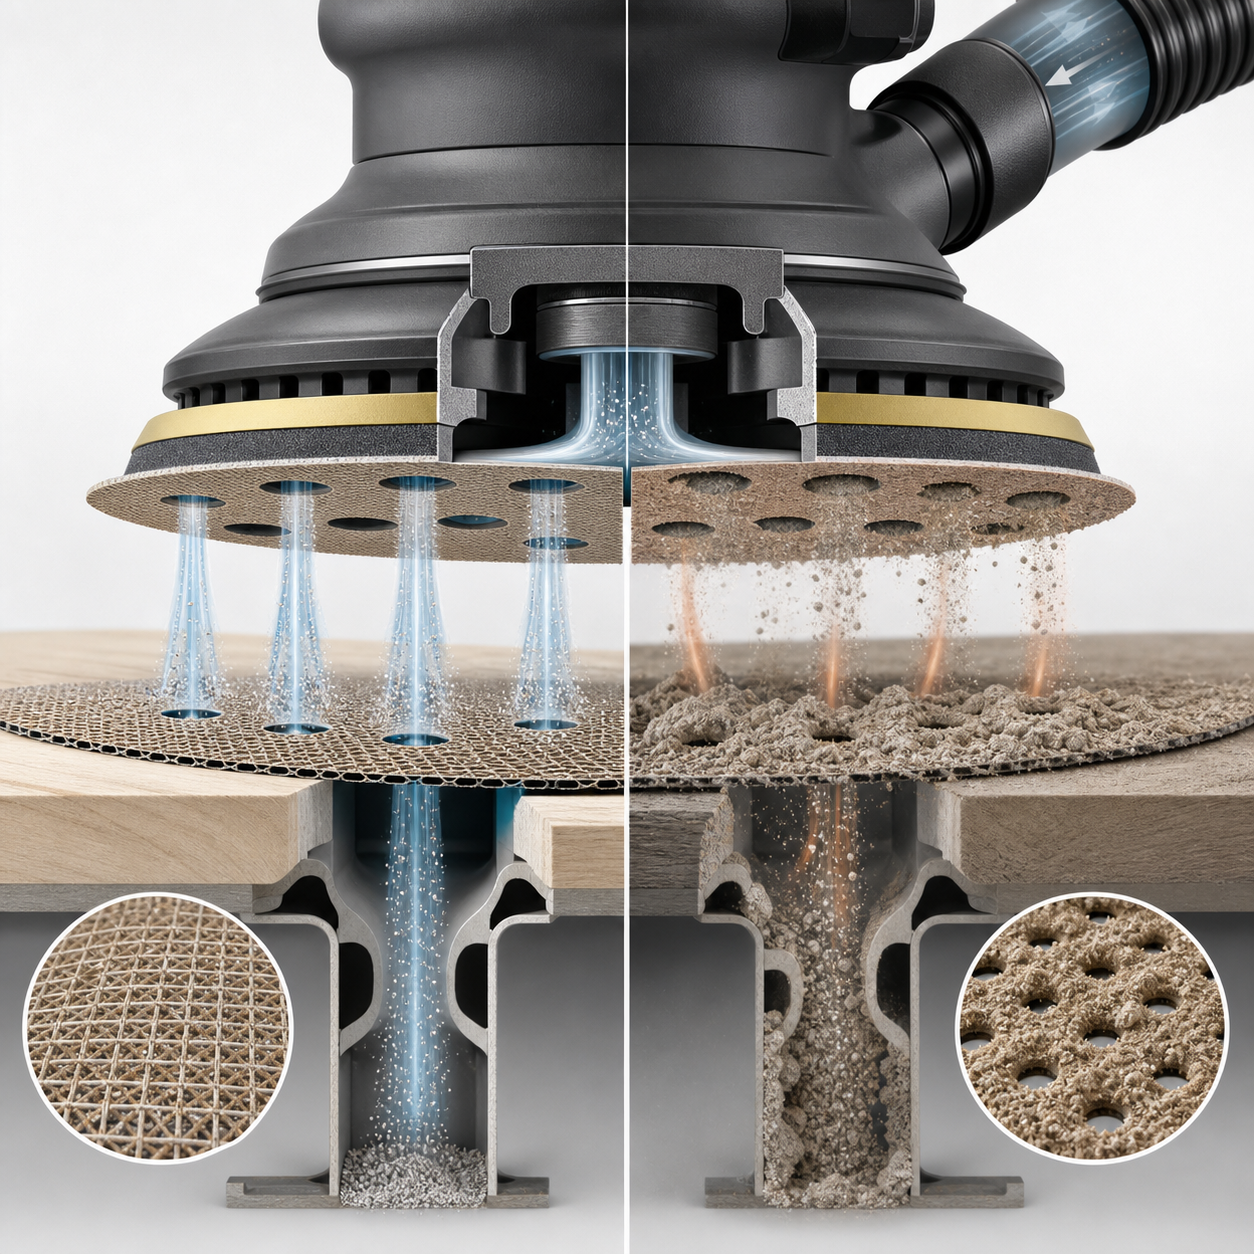
Dust extraction fails first at the contact zone, not in the dust bin. When a 150 mm disc has blocked holes or the wrong pattern, fine dust stays under the grain and turns into heat, loading, and random scratches.
I saw this on a furniture line in Dongguan sanding water-based primer with P180 aluminum oxide discs. Their old 8-hole C-weight paper disc loaded after about 12-15 cabinet doors. After matching a 15-hole pad pattern and adding stearate anti-loading treatment12, disc life improved around 30-40%. The finish also became more stable.
Open-coat spacing helps because the grains leave more room for dust movement. Mesh discs go further because the whole surface can pass dust through, if the pad and vacuum path support it. That matters in body filler, primer, MDF, and softwood sanding. These materials clog fast.
To be honest, many buyers check grit and price but miss the vacuum match. A P240 ceramic grain disc with hook & loop backing can still perform badly if the pad holes sit under solid abrasive. That is the spec sheet gap. Cut rate drops, operators press harder, and the scratch pattern becomes uneven.
Better extraction can reduce airborne dust, but it does not solve exposure or combustible dust compliance alone. The tool, pad, vacuum flow, filter class, ventilation, housekeeping, PPE, and material dust all matter. Local rules matter too.
I suggest testing sample discs on the actual sander, pad, and vacuum setup for one full shift. Check loading, heat, scratch trails, and pieces finished per disc before scaling the order.
On a 150 mm sanding disc, matching the disc holes to the backup pad is more important than simply increasing vacuum power because dust must escape from the contact zone before it compacts under the abrasive grainTrue
If the extraction holes are blocked or misaligned, fine primer or wood dust remains trapped between the workpiece and abrasive. That trapped dust increases heat, accelerates loading, and can create random scratches even when the dust collector itself has strong airflow.
An 8-hole sanding disc will extract dust better than a 15-hole disc on water-based primer because fewer holes keep more abrasive grain in contact with the surfaceFalse
Fewer holes can leave more abrasive area, but dust extraction depends on open airflow paths through the disc and pad. On clog-prone coatings such as water-based primer, a properly matched 15-hole pattern can remove fine dust faster, reducing loading and heat despite having slightly less abrasive area.
How Should Sanding Disc Specs Vary?
Custom sanding disc specifications should vary by application family, matching abrasive grain, backing, coating, attachment, and dust extraction to the material and process. Wood often favors aluminum oxide, open-coat paper or film, and anti-loading treatments; refinish work needs fine film discs with consistent scratch depth; stainless demands zirconia or ceramic grains13 with heat-control aids; robotic sanding requires tight tolerances and repeatable wear.
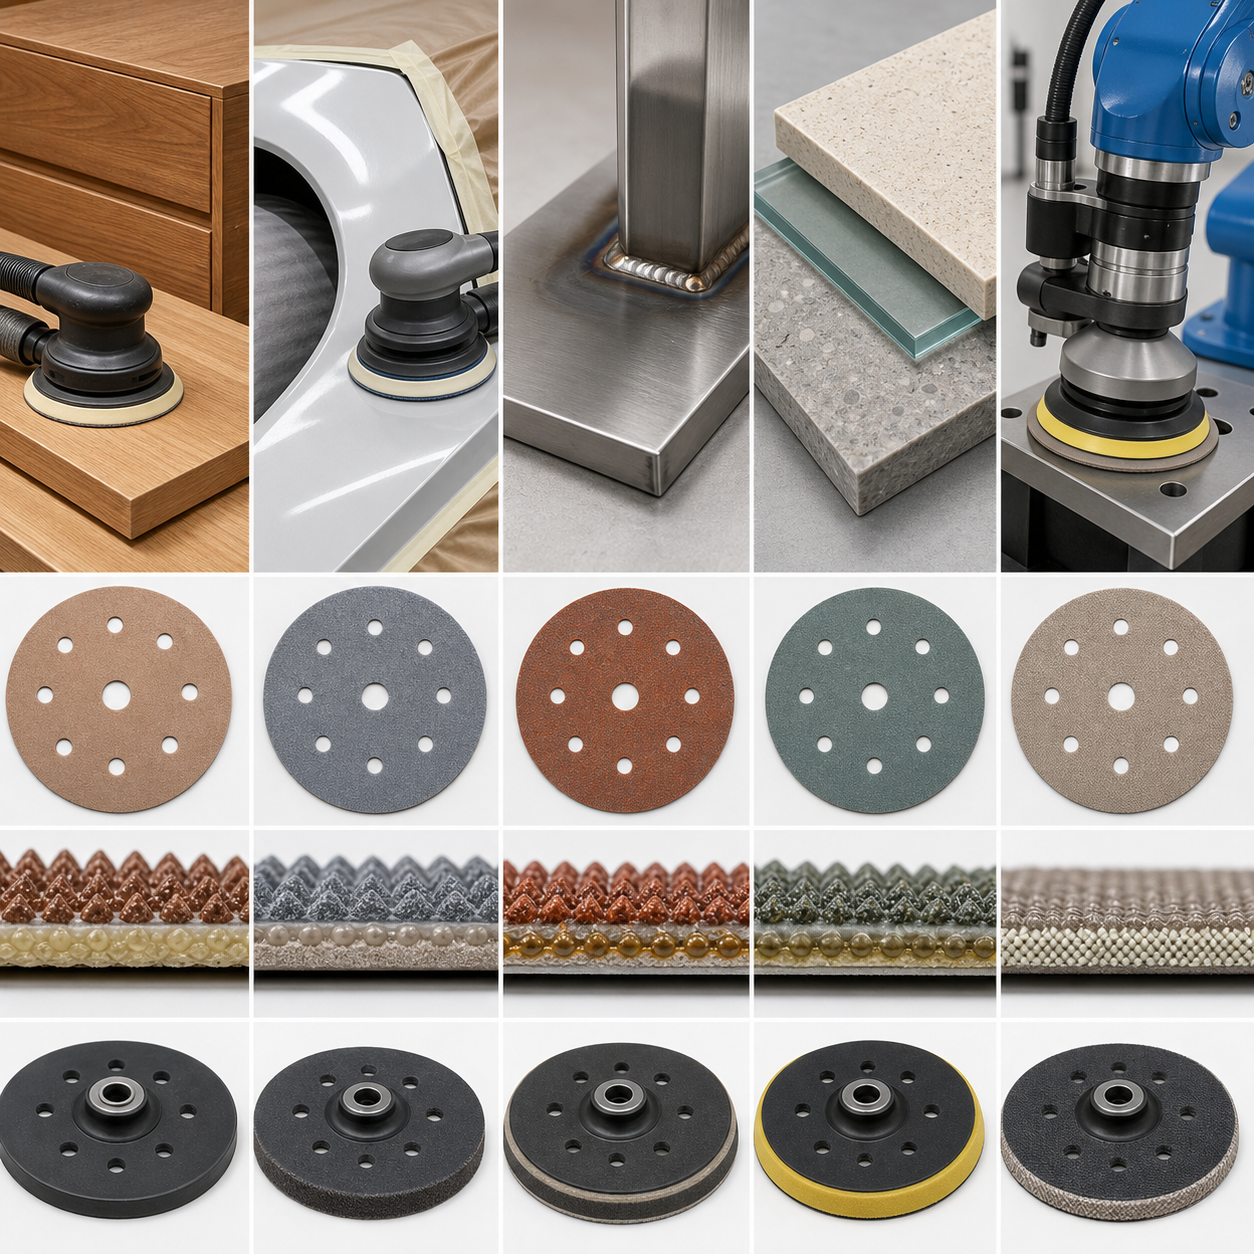
A furniture line and a stainless shop can both ask for 125 mm hook-and-loop discs, but the working edge is completely different. Specs should follow application families because pressure, heat, dust, and finish targets change together.
| Application family | Better starting spec | Trial target |
|---|---|---|
| Wood furniture | P120-P240 aluminum oxide, open-coat paper or film, anti-loading stearate | Clean cut, low loading, stable dust holes |
| Automotive refinish | P400-P2000 film disc, fine resin bond, wet-sanding option | Consistent scratch depth before polishing |
| Stainless fabrication | P36-P120 zirconia or ceramic, cloth or fiber backing, grinding aid | Less heat tint and longer edge life |
| Stone, glass, concrete | Silicon carbide, diamond, or semi-flexible disc | Controlled chipping and debris flow |
| Robotic sanding | Tight diameter tolerance, even backing thickness, stable hook | Repeatable wear and extraction |
I once helped a Dongguan furniture factory compare P180 paper discs against P180 film discs on oak cabinet doors. The film version cost more, but it held flatness better and raised usable life by around 25-30% over a 600-door trial. That mattered more than price per disc.
For refinish work, the story changes. A P800 film disc should leave a controlled scratch pattern, not just remove primer fast. On stainless, I usually move toward ceramic grain with grinding aid because heat can create blue tint within seconds. Robotic sanding is even stricter. Small variation becomes repeated defects.
Define the material, pressure, finish target, disc life, dust pattern, and attachment first. Then test each application family separately before approving a large order.
Two 125 mm hook-and-loop discs can need different abrasive systems: P120-P240 open-coat aluminum oxide with stearate is a better furniture starting point, while stainless work usually needs sharper ceramic or zirconia grain with a heat-control grinding aid.True
Wood furniture sanding is mainly fighting resin/dust loading and finish scratches, so open coat spacing and stearate help keep the disc cutting cleanly. Stainless generates more heat and work-hardening risk, so sharper self-fracturing grains and grinding aids are more important than anti-loading stearate.
If the diameter and hook-and-loop attachment match, the same P180 disc specification can be trialed across wood furniture, automotive refinish, and stainless steel because grit size determines the finish more than backing, coat type, or additive package.False
Grit size is only one specification variable. Backing stiffness, open versus closed coat, stearate, grinding aids, film versus paper, and dust-hole layout all change heat control, loading, scratch consistency, and edge durability, so each application family needs a different starting spec.
How Should Sanding Disc Cost Be Measured?
Sanding disc cost should be measured by accepted output, not unit price. The best metrics are cost per accepted finished part14 or cost per square meter processed. Trials should track cut rate, parts per disc, sanding time, changeovers, defects, heat marks, pad wear, and reject rate to reveal the true economics of custom grain, backing, coating, holes, and attachment choices.
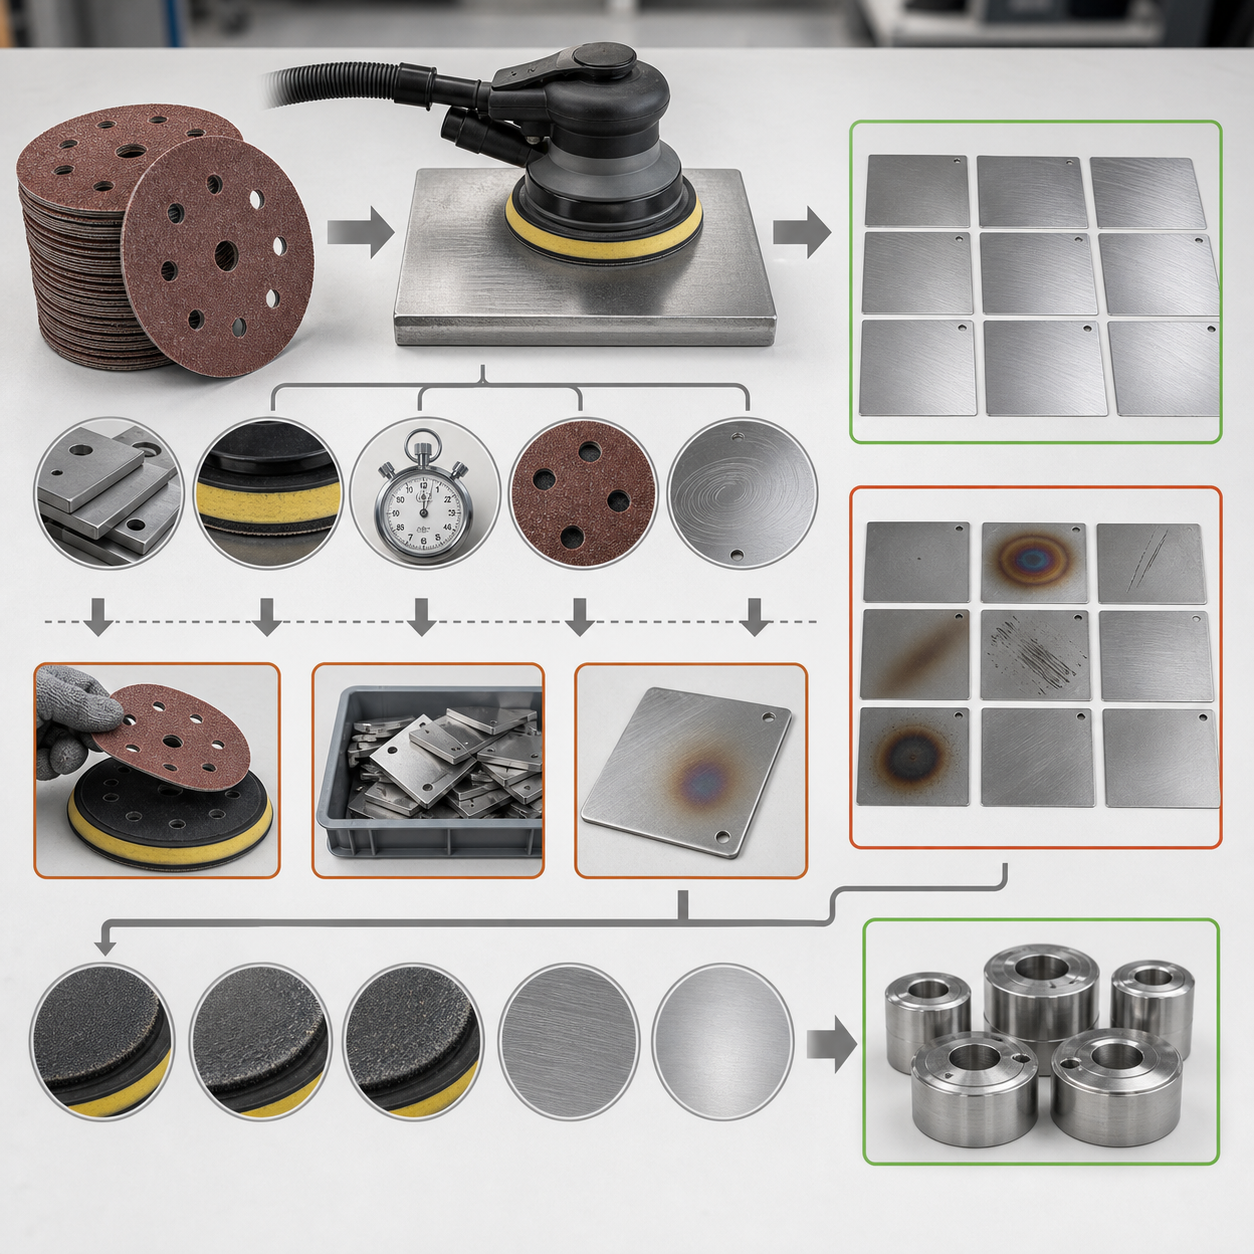
A disc that costs 20% less can still raise sanding cost if it gives 30% fewer accepted panels. The useful number is not price per piece, but cost per accepted finished part or square meter processed.
I saw this clearly with a high-volume cabinet door line using 150 mm hook & loop P180 aluminum oxide discs on MDF primer. Their cheaper C-weight paper disc ran about 55 doors per disc, but loading slowed the cut after the first hour. Operators changed discs more often, and heat marks pushed reject rate close to 4% on dark lacquer colors. We tested a stearated ceramic blend on stronger D-weight paper with the same 15-hole pattern. The unit price was around 18% higher, yet the disc reached 80-90 doors and cut sanding time by about 12 seconds per door. That changed the calculation completely.
Track the whole line during trials: cut rate, disc life, changeovers, pad wear, Ra value15, and rejected parts. Ra value means surface roughness, and it tells whether the finish quality stayed inside your target range. I also suggest checking pad temperature and dust extraction, because poor hole matching can make a good grain behave badly. This is the spec sheet gap many buyers miss: catalog grit and backing data cannot show operator delays, loaded discs, or rework piles.
For custom discs, run at least one normal shift before judging savings. I prefer calculating cost after accepted output, then deciding whether grain, backing, coating, attachment, or hole pattern deserves the extra price.
A sanding disc that is 20% cheaper but produces 30% fewer accepted parts raises abrasive cost per accepted part by about 14%True
If a standard disc costs 1.00 and finishes 100 accepted parts, abrasive cost is 0.010 per part. A cheaper disc at 0.80 that only finishes 70 accepted parts costs 0.0114 per accepted part, before adding extra changeover time, heat marks, rework, or rejects.
When two custom sanding discs have the same diameter, grit size, and abrasive mineral, price per disc is a reliable way to compare sanding costFalse
Backing weight, bond system, coating density, anti-loading treatment, hole pattern, and attachment type can change cut rate, heat buildup, usable life, and reject rate. Two P180 aluminum oxide discs may have very different cost per accepted panel even if their piece price and grit label look similar.
Which Sanding Disc Safety Checks Matter?
Custom sanding disc approval requires verification of marked maximum RPM, backing strength, center hole quality, balance, edge integrity, attachment strength, and safety labeling. The disc type, holder, guard, tool speed, and operating method must match, especially for angle grinder accessories, fiber discs, flap discs, and quick-change products. Batch traceability and applicable abrasive safety standard conformity should also be documented before release.
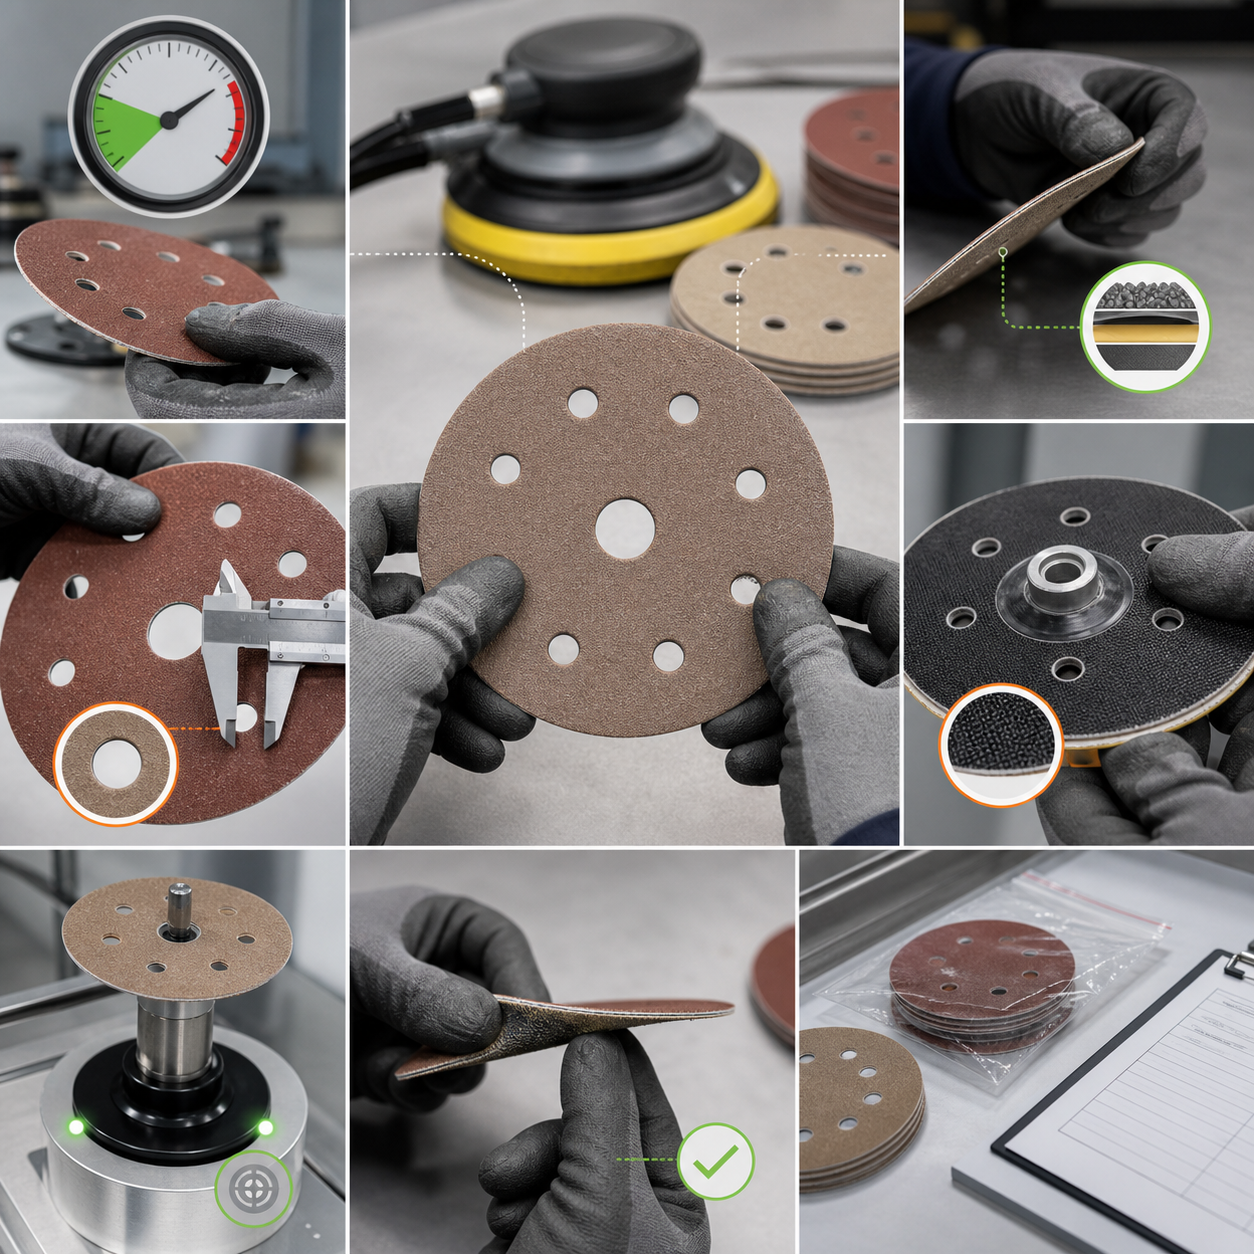
Speed rating is the first safety line because failure happens in milliseconds. A 125 mm disc marked 8,500 RPM does not belong on a grinder running 12,000 RPM, even when the hole fits.
| Safety check | Verify | Reject when |
|---|---|---|
| Maximum RPM | Rating matches tool speed | Missing or lower marking |
| Backing strength | Paper, film, fiber, or cloth holds load | Tears or delamination |
| Center hole and balance | Clean, round, centered hole | Burrs, oval holes, vibration |
| Edge and attachment | Edge, hook & loop, PSA, or lock stays firm | Curling, cracks, weak adhesive |
| Labeling and traceability | Batch code, warning label, standard reference | Unclear print or no record |
I saw this with a furniture customer in Dongguan using P80 hook & loop discs on 150 mm random orbital sanders. Their issue was not cut rate; edge curling after about 20 minutes lifted the disc and caused swirl marks. We changed to heavier C-weight paper and tightened the curing check on the resin bond system. Reject rate dropped from around 6% to below 2% within two trial batches.
For angle grinder accessories, I check the whole system: disc type, holder, guard, tool speed, and operating angle. Fiber discs, flap discs, and quick-change products carry higher risk because operators add pressure and side load.
A sanding disc marked 8,500 RPM should be rejected for any 12,000 RPM tool even if the diameter, arbor hole, and attachment style fit correctlyTrue
Maximum RPM is a structural safety limit, not just a fitment detail. At higher speed, centrifugal force rises with the square of RPM, so running an 8,500 RPM disc at 12,000 RPM greatly increases stress on the backing, bond, center hole, and edge, making burst or delamination more likely.
If a sanding disc has a fiber or cloth backing, it can usually be run safely above its printed RPM rating because reinforced backings are designed to absorb overspeed stressFalse
Backing strength improves load resistance, but it does not override the disc's marked maximum RPM. Overspeed can still cause edge failure, center-hole distortion, imbalance, adhesive breakdown, or disc separation, so the tool speed must never exceed the disc rating.
How Are Sanding Disc Trials And Tolerances Approved?
Custom sanding disc trials should be approved only after real production testing on the actual machine, pad, dust extraction setup, workpiece, operator pressure, and inspection method. Sample size should reflect process criticality, expected consumption, and risk. Written tolerance approval should cover diameter, center hole, hole position, backing thickness, adhesive, loop material, printing, packaging, and batch marking before mass cutting for repeatable fit and performance.
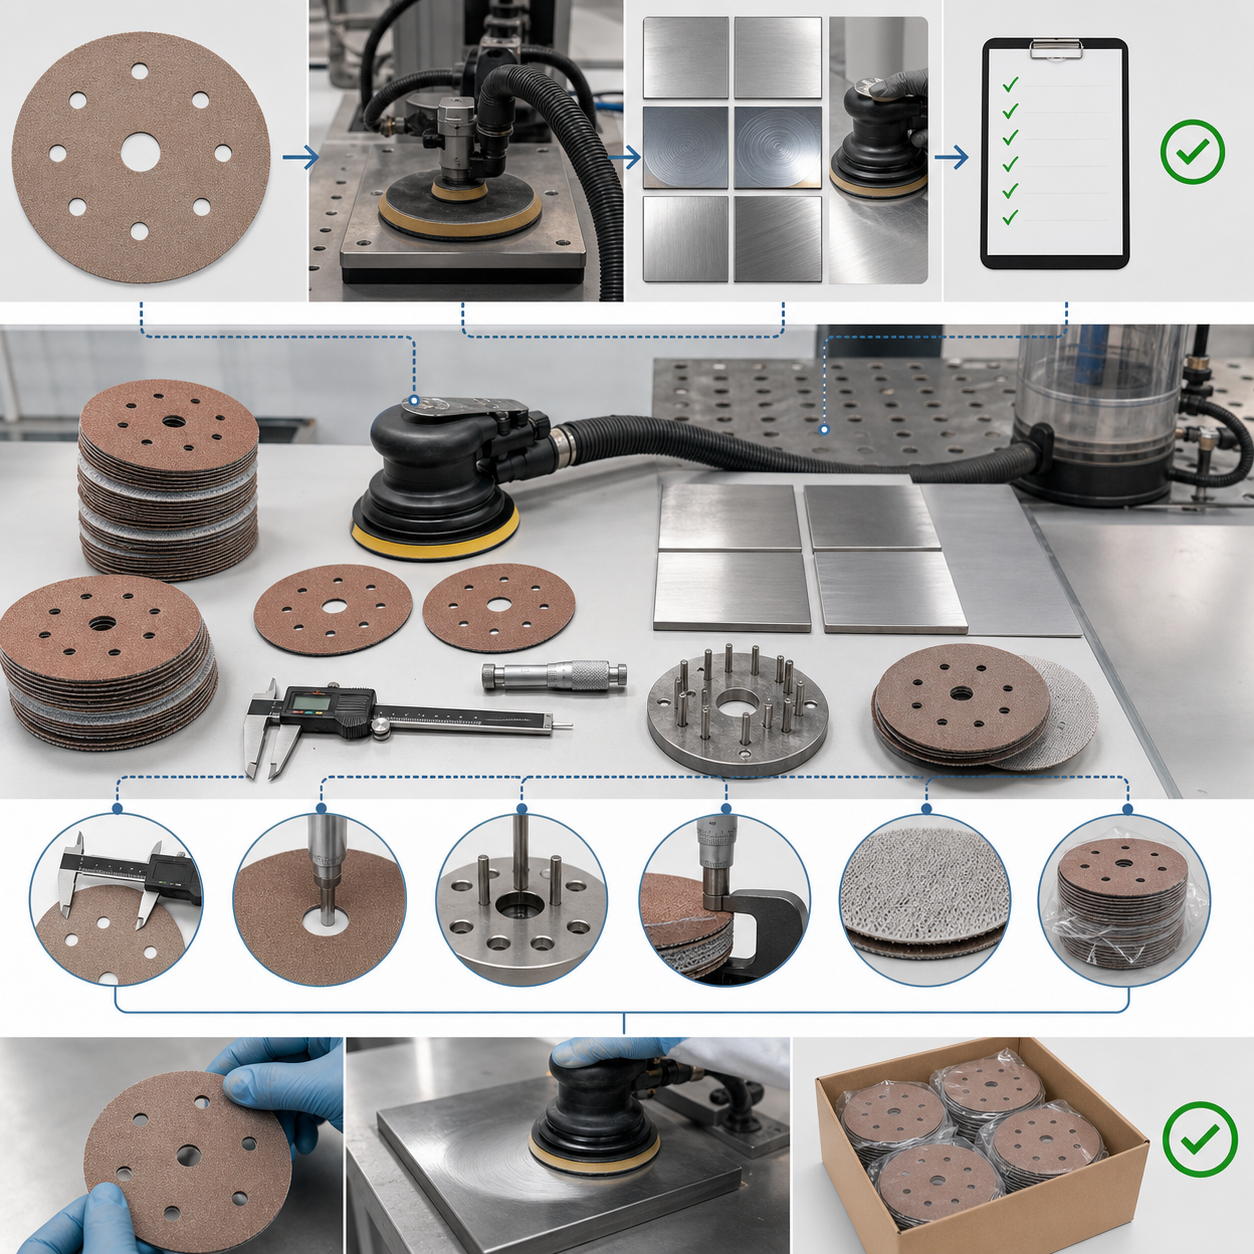
Approval starts when the disc faces the same work, speed, dust path, and operator pressure it will see in daily production. A sample that passes on a clean bench can still fail when the pad is worn, the vacuum flow is weak, or the loader needs exact hole alignment.
Last year, I helped a Dongguan furniture customer test 150 mm hook and loop discs on a six-head orbital line. Their sample looked fine at P180, aluminum oxide grain on C-weight paper, but the 15-hole pattern shifted about 1 mm from the pad ports. Dust stayed under the disc, loading increased after around 35 cabinet doors, and the Ra value, meaning surface roughness, became unstable before primer. We changed the hole tolerance to plus or minus 0.3 mm, tightened center hole cutting, and ran 300 discs across two shifts. I asked them to record doors per disc, edge fray, heat marks, operator comments, and rejected panels.
For manual sanding, 30 to 50 discs may show enough fit and finish information. Robotic sanding or automatic loading needs more proof, because small diameter error can stop feeding or damage the pad. Written approval should include diameter, center hole, backing thickness, adhesive or PSA type, loop fabric, print direction, pack quantity, and batch code. To be honest, this paperwork prevents the classic showroom sample, production disappointment problem. I suggest signing off both a drawing and a pre-production batch before mass cutting. That small pause usually costs less than one rejected carton of custom discs.
A 1 mm shift in a multi-hole sanding disc pattern can be enough to reduce dust extraction on orbital lines, because the disc holes no longer fully register with the backup pad and vacuum channelTrue
Dust-hole tolerance is approved against the actual pad and machine, not only against a drawing. On 15-hole or multi-hole discs, even a small offset can partially block airflow, causing loading, heat buildup, and inconsistent finish during production trials.
If a sanding disc sample passes a flat bench test at the correct grit and diameter, its hole alignment and hook-and-loop holding strength can be approved without testing on the customer's production machineFalse
Bench tests cannot reproduce worn pads, vacuum flow, orbital motion, operator pressure, or exact dust-path alignment. Final approval should confirm fit, extraction, edge wear, adhesion, and finish quality under the same operating conditions used in daily production.
A custom sanding disc works best when grain, grit, backing, bond, coating, size, holes, attachment, and tool all fit the same working condition. One weak match can cause tearing, dust loading, heat, or short disc life.
From my experience, good buyers do not only ask for “ceramic 80 grit” or “hook-and-loop disc.” They describe the material, machine speed, pressure, dust extraction, and finish target first. That avoids the spec sheet gap between what looks right on paper and what survives in production.
Have questions about sanding disc structure or tool compatibility? Reach out anytime. I’m happy to help you check the details before you commit to a custom specification.
References
-
Clarifies when open coat abrasives reduce loading and burning, especially on wood, paint, lacquer, and other clog-prone substrates. ↩
-
Explains how zirconia grains self-sharpen under pressure, helping buyers compare disc life, heat control, and metal removal rates. ↩
-
Covers why ceramic grains excel in high-pressure weld and alloy sanding, with guidance on when the higher cost is justified. ↩
-
Explains how abrasive grit, pressure, backing, and material type affect cutting speed, helping users choose discs or belts more accurately. ↩
-
Covers fiber disc construction, pad support, and safety limits so buyers can match backing stiffness to heavy grinding work. ↩
-
Explains grain coverage, cutting speed, loading risk, and best-use materials so buyers can match disc structure to heat-sensitive jobs. ↩
-
Covers how stearate anti-loading layers manage dust, reduce heat, and protect scratch consistency in primer and finish sanding. ↩
-
Explains how hole patterns affect dust removal, heat buildup, loading, finish quality, and sanding disc life on random-orbital tools. ↩
-
Clarifies grit, attachment type, abrasive material, and furniture sanding applications so buyers can match discs to tools and finish goals. ↩
-
Covers adhesive tack, heat resistance, residue control, and removal choices that affect uptime, surface quality, and rework. ↩
-
Explains how wider grain spacing reduces clogging and heat buildup, helping buyers choose discs for MDF, primer, filler, and softwood sanding. ↩
-
Shows how stearate coatings resist loading, extend disc life, and improve finish consistency when sanding primers, fillers, and soft woods. ↩
-
Compares grain toughness, self-sharpening behavior, heat control, and service life for selecting stainless grinding discs. ↩
-
Shows how to compare disc price with yield, cycle time, rejects, and changeovers so buyers choose abrasives by real production cost. ↩
-
Explains how Ra value is measured and linked to finish quality, helping teams verify sanding trials beyond disc life or price. ↩